

Pro plan. You can design email templates on every plan, but the Send email steps that use them are part of Pro and Agency. Each inbox is a paid add-on (US$7 a month), not part of the free trial. See Plans and billing.
Create a template
1
Open Email templates
In the menu on the left, click Templates, then Email templates at the top.
2
Create template
Click Create template. Kerux asks Choose how to build it:
- Block Builder: drag and drop blocks (text, pictures, buttons, columns and more).
- HTML Code Editor: write or paste HTML, with a live preview side by side.
- Plain Text Email Builder: simple text, no design.
3
Build it
Give it a name and a subject at the top. To put a variable in the subject (for example the contact’s first name), use the Insert menu at the end of the subject box. In the Block Builder you can also describe the email and let the AI lay it out (see Build an email with AI). Everything is saved by itself a moment after each change (the top bar says Saved). Undo and Redo are next to it, and Preview shows the email on a computer or a phone.
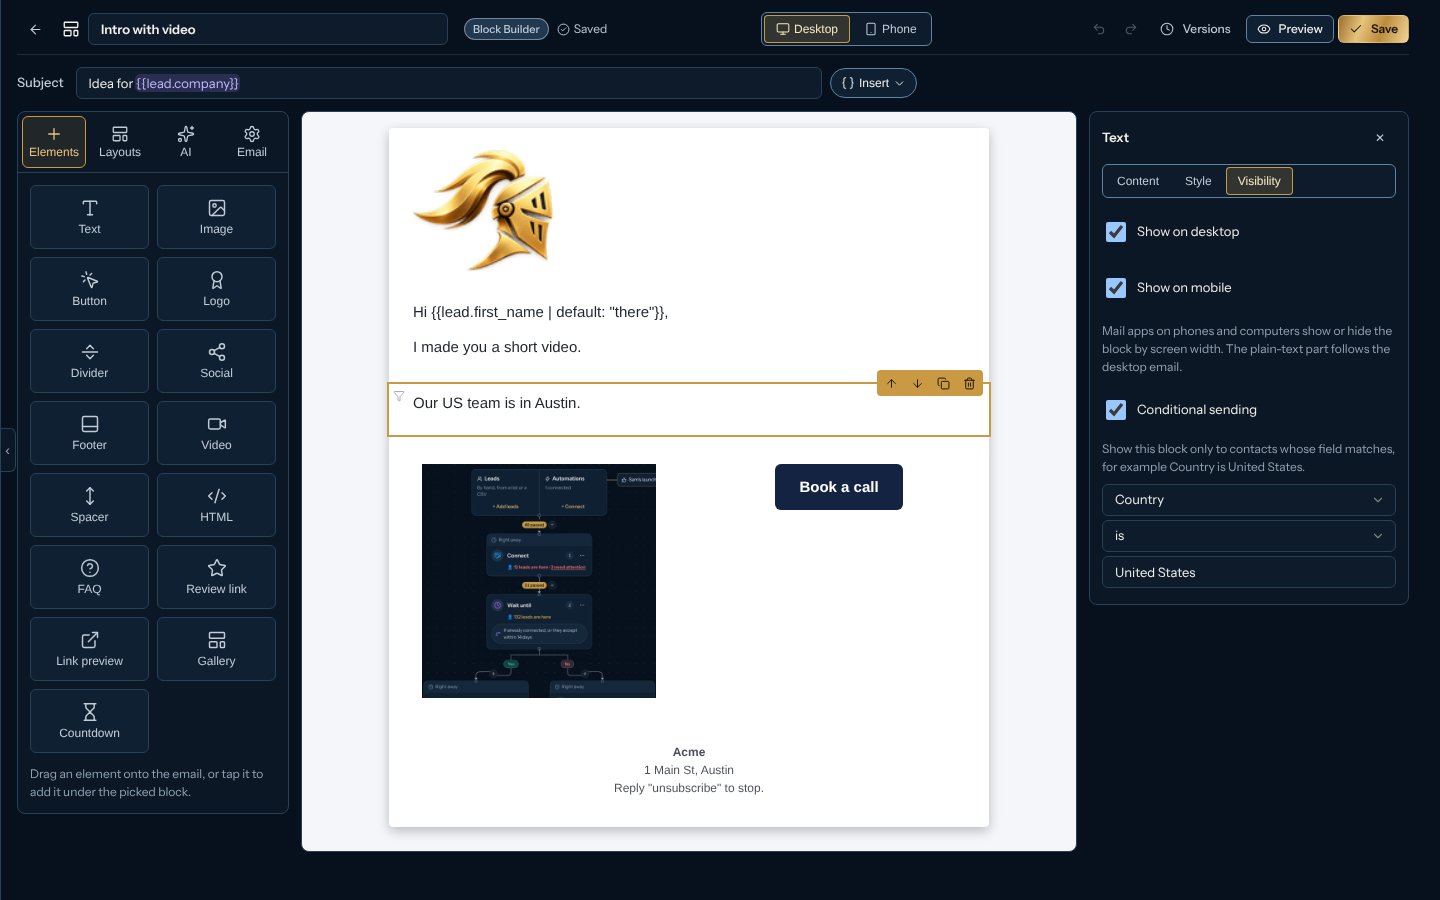
The Block Builder
When you open a template, Kerux’s main menu is hidden so the email gets the room. Click the small tab on the left edge of the screen (Show the menu, or press Ctrl+\ / ⌘\) to show it again; Kerux remembers your choice for the next templates. On a computer the editor uses the whole screen: its own top row (back, name, Saved, Desktop / Phone, Undo, Redo, Versions, Preview and Save) sits at the very top, with the email right under it.- The panel on the left has four tabs: Elements, Layouts, AI (describe the email and the AI builds it) and Email (the email’s own settings). Elements are Text, Image, Button, Logo, Divider, Social, Footer, Video, Spacer, HTML, FAQ, Review link, Link preview, Gallery and Countdown. Layouts are 1, 2, 3 or 4 columns, 1/3 : 2/3, 2/3 : 1/3, 1/4 : 3/4, 3/4 : 1/4 and Text & Image. Drag one anywhere onto the email (it goes where you drop it, or at the end), or tap it to add it under the block you picked. A new email shows Start your email with buttons to add a Text, Image or Button right away, or Build with AI.
- The email (middle): click a block to pick it. Its small toolbar moves it up or down, duplicates or deletes it; you can also drag a block to another place, or into a column. Switch between Desktop and Phone in the top row, after Saved: on phones, columns sit one under the other.
- The block’s settings (right, once you pick a block; close them with the X):
- Content: the text (bold, italic, underline, links, lists, alignment and the variable buttons), a picture’s address or upload and its link, the button’s text, link and colors, the social links, the footer’s company, address (a new Footer block starts with the company name and postal address from Settings > Sending rules) and how to stop the emails, and so on. A Footer block is optional in campaign emails: a Send email step always adds its own short line on how to stop the emails and your postal address at the very end (see Write and send emails).
- Style: background color, text color, padding, alignment and font size. The colors on top follow Kerux’s own palette; any other color works too.
- Visibility: Show on desktop and Show on mobile, and Conditional sending: show this block only to contacts whose field (a contact, company or custom field) matches, for example Country is United States. Each contact gets their own version of the email.
- Email settings (the Email tab on the left) set the email’s width, colors, font and the preview line (the grey text next to the subject in an inbox).
A Video block shows a picture that opens the video (emails can’t play videos). YouTube links get their picture by themselves.
- FAQ: questions and answers, one under the other (mail apps can’t open and close sections, so every answer shows).
- Review link: a line and five stars that take them to your review page (for example your Google review link).
- Link preview: a card with a page’s picture, title, description and site. Paste the link and click Get from the link, or fill it in yourself.
- Gallery: pictures side by side, 2 or 3 per row. A slider doesn’t work in Gmail or Outlook, so the gallery shows them all.
- Countdown: the days, hours, minutes and seconds left until the time you pick (in your own time). It’s a picture Kerux draws each time the email is opened, so it’s always current; pick its language and colors.
Build an email with AI
Describe the email in your own words and the AI lays it out with blocks (logo, text, button, footer and so on). You then edit it like any other email.1
Open Build with AI
In a Block Builder template, click the AI tab in the panel on the left (or Build with AI on a new, empty email).
2
Describe the email
Write what you want in the box, for example: “A welcome email with our logo, a short intro, a Book a call button, and a footer.” Up to 2,000 characters.
3
Build it
Click Build it. The button says Building… while the AI works. The new layout appears in the middle, with a subject and a preview line when the AI wrote them.
4
Finish it
Read the note under the button: it says what is left to do, for example Upload your logo or images in the image blocks. or Add the link to the button. Then click any block to change its words, pictures, links or style.
- The AI uses text, logo, image, button, divider, spacer, social, footer and video blocks. Add columns or HTML by hand afterwards.
- It never makes up pictures or links: logo and image blocks come in empty for you to upload, and a button gets a link only when your description gives one.
- It writes in the language of your description, and it can personalize the text with the contact’s first name and company (each with a default, so an empty value never leaves a hole).
- The new layout replaces the email you had, including its email settings. Click Undo at the top to get the previous one back.
- Each build uses your workspace’s monthly AI credits. When the monthly AI credits are used up, Kerux builds a simple starting layout instead and uses no credits.
- If the AI isn’t available at that moment, Kerux still builds a simple starting layout from your description (a text block that starts from your words and a footer, plus a logo, button, video or social links when you mention them) and says so in the note.
- If nothing could be built, Kerux shows Could not build it right now. Try again, or add blocks by hand.
- Only members, admins and owners see Build with AI (viewers can’t edit templates).
Pictures and GIFs
Add a picture by itshttps:// address or upload one (PNG, JPG, GIF or WebP, up to 1 MB; 25 MB per workspace). Animated GIFs work, and any picture can have a Link when clicked. Uploaded pictures get a public address, because the people you email open them without signing in to Kerux. Your pictures in the same window lists your uploads with the space they use: tap one to use it again, or delete the ones you no longer need (emails already sent with a deleted picture show it broken).
The HTML Code Editor
Write or paste HTML on the left; the preview on the right follows as you type. Variables work inside it ({{contact.first_name}}, {{email}}). The plain-text part that goes with every HTML email is written for you.
The Plain Text Email Builder
A plain message with the variable buttons. It is sent as you wrote it, like an email you typed.Use a template in a campaign
1
Open the Send email step
On the canvas, click the Send email step.
2
Use a template
In the step’s panel, open How you write this email (near the end) and click Use a template and pick one in Email template. Or click Create a template: when you’re done, Use in the email step brings you back to this step with the template in it.
3
Linked or copied
Keep linked: every email goes out with the template’s latest version, so an edit of the template reaches this step. Copy into this step: the subject and message become this step’s own, to edit right there. Edit template opens it in its builder, Preview shows it for a contact, and Stop using it goes back to writing the email in the step.
Good to know
- Anyone in the workspace can open templates; members, admins and owners can create, change, duplicate and delete them (viewers can’t).
- A template’s HTML can be up to 100,000 characters, its subject up to 300.
- Every template is saved with its versions: Versions in the top bar lists them, and Restore brings one back (as a new version, so nothing is lost). Quick changes within a few minutes count as one version; the last 50 are kept. An edit never overwrites someone else’s newer save (Kerux asks you to reload).
- What emails can’t carry is always removed: scripts, forms, frames and unsafe links.
- An empty variable never goes out: the contact waits and shows what is missing.
- A deleted template: the steps linked to it send the copy they took when it was picked, and the campaign’s checks before launch say so.
- In the API:
/v1/email-templates(list, create, read, change, delete, versions, restore, duplicate) and/v1/email-images(upload, list and delete pictures).